Core Data의 CRUD (Create, Retrieve, Update, Delete)를 구현할 때 Fetched Result Controller를 구현하여 사용할 수 있습니다.
Core Data는 영구적으로 어떤 데이터를 저장할 수 있도록 해주는 도구인데, 일반적인 Database와는 조금 다른 양상을 보입니다.
하지만 데이터베이스와 유사한 구조를 가지고 있으며 관계 또한 지정할 수 있기 때문에 직관적으로 데이터를 정형화할 수 있습니다.
User Defaults와 다른 점은 User Defaults는 Key-Value의 구조를 가지고 있다면 Core Data는 Entity에 다양한 Key들이 있고 Entity에는 Key에 해당하는 값들이 존재합니다.
관계는 데이터베이스에서 1:1, 1:N, N:1, N:M과 같은 관계를 지정할 수 있으며 직접적으로 외래키 키워드를 사용하지는 않지만 On Cascade나 Nitify와 같은 삭제 시 수행할 수 있는 역할 또한 지정할 수 있습니다.
이러한 Core Data를 활용하여 간단한 CRUD를 구현해보도록 하겠습니다.
Core Data는 실제 데이터베이스의 데이터를 Mapping 해놓았다고 보시면 편합니다. Swift 코드 상에서 코어 데이터의 Object를 삭제하고 save를 하면 실제 Core Data의 Database 내에 저장된 데이터 역시 삭제되는 형태입니다.
아, 이 포스트에서는 Core Data Model은 구성했다고 가정하고 진행됩니다.
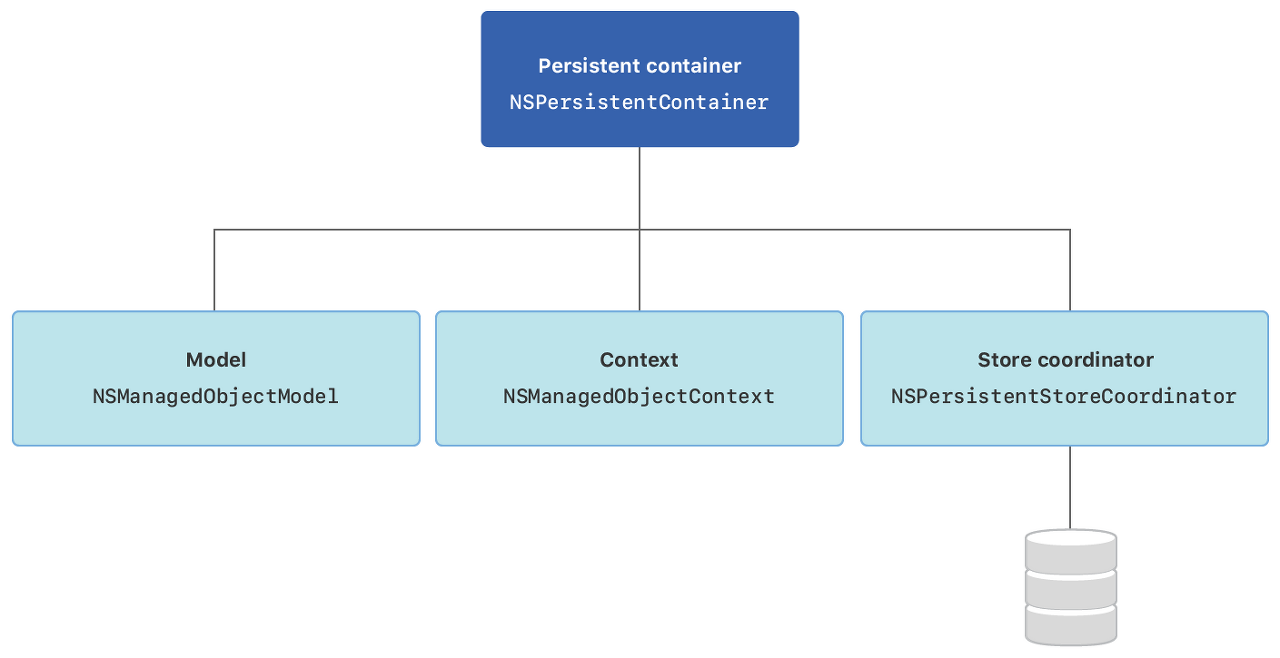
우선 구성 요소를 살펴보도록 하겠습니다.
1. NSManagedObjectModel
Application 내에서 사용하는 다양한 Property, Type, 관계 등을 정의한 Model입니다.
2. NSManagedObjectContext
Application의 instance의 타입/프로퍼티 등의 상태를 추적하는 요소입니다. 데이터가 삭제되거나 변경되거나 새로 추가되면 각 상태를 추적하고 있다가 실제 데이터베이스(store)에 적용해 줄 수 있도록 해주는 요소라고 보시면 됩니다.
3. NSPersistentStoreCoordinator
실제 데이터베이스(store)에 Instance의 타입/프로퍼티 등을 저장하거나 실제 데이터베이스(store)로부터 가져옵니다.
4. NSPersistentContainer
위에서 언급한 NSManagedObjectModel, NSManagedObjectContext, NSPersistentStoreCoordinator를 가장 처음에 한 번 초기화 작업을 해주는 요소입니다.
1. NSPersistentContainer 초기화
class AppDelegate: UIResponder, UIApplicationDelegate {

    ...

    lazy var persistentContainer: NSPersistentContainer = {
        let container = NSPersistentContainer(name: "DataModel")
        container.loadPersistentStores { description, error in
            if let error = error {
                fatalError("Unable to load persistent stores: \(error)")
            }
        }
        return container
    }()

    ...
}
App Delegate에 정의를 합니다. lazy var 형태로 정의하여 필요할 때 초기화 작업을 할 수 있도록 해줍니다.
"DataModel"에는 본인이 구성한 Core Data Model의 이름을 적어주면 됩니다. Entity 이름과는 별개입니다.
2. CRUD - Create
Create 작업을 해보도록 하겠습니다.
func createData() {
	guard let appDelegate = UIApplication.shared.delegate as? AppDelegate else { return }
    let managedContext = appDelegate.persistentContainer.viewContext
    let userEntity = NSEntityDescription.entity(forEntityName: "User", in: managedContext)!

    for i in 1...5 {
    	let user = NSManagedObject(entity: userEntity, insertInto: managedContext)
        user.setValue("Name\(i)", forKeyPath: "username")
        user.setValue("mail\(i)@gmail.com", forKeyPath: "email")
    }

    do {
    	try managedContext.save()
    } catch let error as NSError {
    	print("error : \(error)")
    }
}
appDelegate에서 persistentContainer를 불러오고 managed Context를 생성합니다. 이 부분은 모든 연산에서 공통적인 부분입니다.
그 다음 불러오고 싶은 Entity를 지정하고 NSManagedObject를 생성하여 생성된 객체에 속성 값을 지정해줍니다. (setValue)
그 다음 managedContext의 save 연산을 통해 현재의 상태를 실제 데이터베이스(store)에 저장합니다.
3. CRUD - Retrieve
Retrieve는 Fetch라고 생각하면 됩니다. SQL에서는 SELECT * FROM ~~~ 라고 생각하시면 쉽습니다.
과정
1) 엔티티에 대해 NSFetchRequest 유형의 요청을 준비합니다.
2) 필요한 경우 필터 데이터에 Predicate를 사용합니다.
(SQL의 WHERE와 비슷한 것, 문법은 다르나 단순 AND OR와 같은 연산으로 이루어짐)
3) [NSManagedObject] 배열 형태로 컨텍스트에서 결과를 가져옵니다.
4) 특정 키의 값을 얻기 위해 배열을 반복합니다.
func retrieveData() {
	guard let appDelegate = UIApplication.shared.delegate as? AppDelegate else { return }
    let managedContext = appDelegate.persistentContainer.viewContext
    let fetchRequest = NSFetchRequest<NSFetchRequestResult>(forEntityName: "User")

    do {
    	let result = try managedContext.fetch(fetchRequest)
        for data in result as! [NSManagedObject] {
        	print(data.value(forKey: "username") as! String)
        }
    } catch {
    	print("error")
    }
}
4. CRUD - Update
업데이트 레코드의 경우 먼저 위의 데이터 검색 프로세스와 동일한 Predicate를 사용하여 데이터를 Fetch / Retrieve 해야합니다.
1) Entity의 Predicate를 사용하여 요청을 생성
2) 레코드를 가져오고 키로 새 값을 설정
3) 마지막 저장 컨텍스트는 데이터 생성과 동일
func updateData() {
	guard let appDelegate = UIApplication.shared.delegate as? AppDelegate else { return }
    let managedContext = appDelegate.persistentContainer.viewContext
    let fetchRequest: NSFetchRequest<NSFetchRequestResult> = NSFetchRequest.init(forEntityName: "User")
    fetchRequest.predicate = NSPredicate(format: "username = %@", "name1")

    do {
    	let test = try managedContext.fetch(fetchRequest)
        let objectUpdate = test[0] as! NSManagedObject
        objectUpdate.setValue("newName", forKey: "username")
        objectUpdate.setValue("newEmail", forKey: "email")
        do {
        	try managedContext.save()
        } catch {
        	print(error)
        }
    } catch {
    	print(error)
    }
}
5. CRUD - Delete
레코드를 삭제하려면 먼저 fetchRequest로 삭제하려는 객체를 찾아야 합니다.
1) 엔티티에 대한 Predicate로 요청을 준비합니다.
2) 삭제하려는 Record를 가져옵니다.
3) 그리고 context delete 함수를 호출합니다.
func deleteData() {
	guard let appDelegate = UIApplication.shared.delegate as? AppDelegate else { return }
    let managedContext = appDelegate.persistentContainer.viewContext
    let fetchRequest: NSFetchRequest<NSFetchRequestResult> = NSFetchRequest.init(forEntityName: "User")
    fetchRequest.predicate = NSPredicate(format: "username = %@", "name1")

    do {
    	let test = try managedContext.fetch(fetchRequest)
        let objectToDelete = test[0] as! NSManagedObject
        managedContext.delete(objectToDelete)
        do {
        	try managedContext.save()
        } catch {
        	print(error)
        }
    } catch {
    	print(error)
    }
}
UPDATE와 상당히 유사한 구조를 보여줍니다.
단순히 object를 삭제하고 save를 한 것 뿐인데 실제 데이터베이스에 반영이 되다니 정말 간편한 것 같습니다.
이번 포스트에서는 2020년 첫 포스트로 iOS의 CoreData에 대해 알아보았습니다.
'클라이언트' 카테고리의 다른 글
| GCD에 대해 알아보기 (Dispatch Queue) (0) | 2020.01.24 |
|---|---|
| iOS Kingfisher로 비동기 이미지 불러오기 (0) | 2020.01.24 |
| iOS TDD - Unit Test 시작하기 (2) | 2019.12.21 |
| iPad에서 Multiple Windows 다중 창 지원 - (1) (0) | 2019.12.21 |
| Keychain을 사용한 민감 정보 처리 (0) | 2019.12.07 |